My how time flies!

Well I am sure you may have noticed that I have been a little MIA around here lately.  I cannot believe that it is November already! I swear is was just April a couple months ago.  Things on my end have been a bit crazy, we had a huge project come up at work which meant I was just working like crazy over the summer and then it was extension time for taxes and that ended in October and here we are at the start of November.  So I am finally to a point where I can breath and wanted to swing by and give you a glimpse into the last few months.

First up I want to give a quick update on the Etsy shop! Things have been going really well, I am not crazy busy but things are selling.  I kind of like it this way where I am getting an order here and there.  It allows me time to make sure that I am not rushing products out the door.  I will say that the best thing so far in my shop has got to be the Instax Mini Albums.  I can’t keep them in stock!  Which makes me so happy, and also means that I am working on a new cover designs which I hope to have up before Thanksgiving.  As well as a whole new size album which I think should be created just in time for the crazy soon holiday season!  So be sure to keep checking in on the Etsy shop over the next month or so for new products.  If you have twitter you can click on the side bar to the right and follow me and/or if you are big on Instagram be sure to follow me at TheBlurredLinesofSanity. I post pictures of new items as well as behind the scene type photos, a sneak peek of Instagram is also located on the right hand side.

I also want to let you guys know that I have taken up a new hobby of knitting.  No it isn’t just for little old ladies, I honestly had no clue how relaxing this hobby would be.  Then it wasn’t until I was a few projects in that I came to terms with the fact that I have been sucked in.  I started learning to knit back in early summer, I can’t even tell you how it started other than I tried about 7 yrs ago to knit and I did fine but it just never stuck.  But this time I picked up those needles and I haven’t been able to put them down.  I have managed to knit a pair of socks, a blanket, a scarf, & two hats completely.  I am still working on 2 sweaters; these are my down fall so far, because I work on them then put them down to do some other project that I can complete quickly since a sweater is no small feat and they take forever.  But I am sure once they are completed they will be some of my favorite things.  So don’t be surprised if in the coming months there are some knitting related posts.  I signed up for Yarnbox, which is a monthly yarn subscription where they send out a surprise yarn based off what you set as your preferences.  Since I am a few months in I think I am going to start doing reviews on the boxes I get/got.  I would also like to do some posts on just the things that I am working on so that other new knitters can see how things come a long.  I know I like looking at others knitting projects and ideas while I am trying to figure something out.  If you are on Ravelry you can find me here.  I am still learning how to fully use this site but it has been fun seeing all the patterns and getting to see notes from people who have made the item before.

If you have taken up a new hobby or even picked up an old one let me know in the comments! I would love to hear what everyone has been doing or what you are going to be doing through the end of 2014!  I have some posts planned over the coming weeks so please bear* with me as I get back on track!

*Full disclosure I totally had to look up if it was “bear” or “bare” and I learned you use bear because it is for forbearance which completely makes sense once I read it. If I used bare I would basically be asking you to get undressed with me.  So there is that tidbit for the day.
 

Etsy Shop News!

Hi Guys!

Well I am happy to report that my Etsy shop has officially opened as of this past weekend!  If you follow me on Twitter or Instagram you have already seen the pics and the link so I apologize for the overload of Etsy. 🙂

So the process of getting the shop open was very nerve wracking.  For a good 10 mins I battled with myself and the computer on whether or not I was ready to face the world and open up.  There is this button that all you have to do is click it and you are open well I kept bypassing that screen and double checking the listing, my policies, my about, the picture, the heading, etc…. Until finally I was like forget it just push the button and open!  That little pep talk and a few choice words to myself got me to just click the button.  Which means the shop is live and ready for orders! Please go check out the brand new store: Blurred Lines of Sanity

Currently I only have one item listed at the moment, and it is for a screen printed Moleskine notebook. I am hoping to have some jewelry pieces and more notebooks up on the site over the next few weeks.  Especially since I got the shop opened earlier than planned!  I will admit I have been one of those people constantly checking the Etsy app to see how many views I’ve gotten and I was totally smitten when I saw that some actually favorited* my notebook.  It’s the little things in life.

When you check out the shop be sure to come back here and leave me a comment letting me know what you think as well as if you have any themes you would like to see! I would love to hear from everyone!

Thanks for sticking with me on this crazy journey, I can’t wait for what is ahead!

*is favorited even a word? Isn’t that the action of to favor something online? The red squiggly line says its a word but only if capitalized, I am rebelling and using lowercase 🙂 Let me know if the comments.

Quick Note

Hi guys! I promise that I am still alive and working on the blog, just in the hidden back room.  My day job unfortunately has me under piles of paper leaving very little time to get things posted and up.  But since it has been awhile since I posted I wanted to swing in and give you a glimpse into what has been happening in that hidden back room.

Things are in full design mode for my upcoming Etsy shop; I am working on some stamped metal jewelry as well as screen printed notebooks.  I am just trying to narrow down a few designs and will get the shop listed hopefully by the end of next month; with a few select pieces just to see how things go.  I have been trying to find the right materials for the jewelry because there are just so many options out there I am still trying to learn which are the best quality.  The notebooks I have already waiting to be printed I am just trying to decide if I want to print them as they are ordered or all at once.  It’s funny what goes through your mind when you are starting an Etsy shop.

I have also been dealing with the fun oddities of owning a home.  I tried to buy a new fridge since the current one I have is just not working for me anymore.  I went and picked out this lovely new Kenmore Elite Grab-N-Go fridge from the Sears Outlet.  It had a couple dents in it but I was told they are totally functioning.  So I bit the bullet and bought it saving approximately $2500 on the cost because it had a couple dents.  Well a week later on Valentine’s day I was patiently waiting for my lovely new fridge to get there.  It of course did and I was so excited, it got hooked up and looked all pretty in my kitchen.  But that was were the fun ended, while the installer was testing the water line nothing was happening.  Fast forward 5 mins I notice that water is now on my floor but we can figure out where it is coming from.  He was checking the line on the back and it wasn’t dripping.  That is when I decide to open the french doors and was greeted by a rush of water.  The fridge had been collecting water inside the entire time we were pushing the water button on the outside.  Needless to say I had to send my Valentine’s present to myself back and I am stuck with my boring fridge until after tax season.  When I will have more time to take time off of work for deliveries.

On the tail end of this delivery when they were turning the water off and on under my sink it loosened up something and I got a leak.  Which of course I didn’t know about until a week later when I went in for dishwasher soap.  I managed to narrowed down the leak and kind of knew what I needed to do in order to fix it.  But that meant I would need to head to Lowe’s where I get to be that girl wandering around with no clue where to go in the home improvement store.  I stood and stared at the wall of valves for what seemed like forever until I saw an employee, unfortunately he had to pass me off to a gentlemen who was only moderately happy to help me.  I say moderately because he admitted it had been a long day for him and I could tell he really didn’t want to help me.  But he sucked it up and helped me find the right valve.  I went home all ready to switch the valve out and then quickly learned that while I have all the brains to do this I lack the brawn to complete the task at hand.  I did manage to put some teflon tape on the threads of where the leak was coming from and when I screwed the tube back on it seems to be holding the leak at bay.  But while the leak may have stopped I am still in need of replacing the valve because I sense that when I get a new fridge again this could happen all over again and I want to prevent that.  So lucky for me I have a step-dad who has the brawn to come over and get the valve off the wall for me sometime in the near future.

Of course all of this is happening during the busiest time of year for me at work.  I am working crazy hours so I have to admit I am dead tired once I walk through my doors at night so I am a little slow at getting posts written.  Hopefully I will get a break and can get something up over the next few weeks.  So please stay tuned as I work through all these kinks!!

Turkey Pesto Pizza

Well I am a little late to the party with this recipe I originally planned to have it up right after Thanksgiving, except I kind of suck 🙂 and the time just got away from me!  Since it is the middle of January it is safe to say that we have safely survived the holidays.  Unfortunately this means you probably do not have any left over turkey breast waiting in the fridge to be gobbled up anymore.  But hopefully even though the holidays have passed you aren’t too burnt out on turkey because you are going to want to try this pizza recipe; at least one time!  Now since we are assuming you do not have any leftover turkey you can head over to the recipe I posted awhile back for crockpot turkey breast.  If you whip this up you can then come back and make this recipe with the leftovers; well if there are any leftovers after that meal.  😉

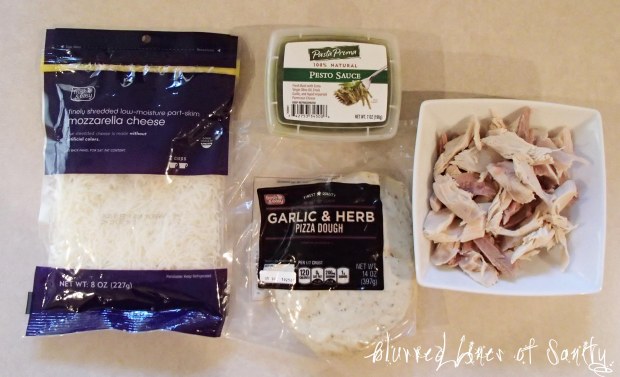
If you’re anything like me you get bored easily eating the same thing over and over and I am guilty of wasting perfectly good leftovers because I just can’t bare to eat the same thing again which is why this recipe is good because you can use leftover turkey or even chicken that you have in your fridge.  During the holidays I had all this leftover turkey and I didn’t want any of it to go to waste I wanted to make sure I try something different with the meat to keep my taste buds from getting bored.  This pizza recipe started with me being at the grocery store picking up a few basics when I came across garlic & herb pizza dough in the refrigerator section of my Fresh & Easy.  This was something I hadn’t seen before and it sounded yummy and different, but I wasn’t quite sure how to make a pizza with this dough.  It isn’t a plain crust so not just anything would go with it.  That was when I saw the pesto just below the crust and realized that the mix of pesto and turkey could make for an interesting pizza.  That was how this pizza was quickly born and luckily for me the flavors of the turkey with the pesto and the herb crust was just perfect.

This is a quick and easy dinner or in my case lunch.

OLYMPUS DIGITAL CAMERA

Ingredients

1 package premade pizza dough (you can use homemade or any pizza dough you love)

1/2 cup to 3/4 cup pesto sauce

1 cup shredded mozzarella cheese

1 cup precooked turkey(chicken); I used both white & dark meat

Follow any preparation directions on the pizza dough; for the Fresh & Easy dough you have to leave the dough at room temperature for 30 mins before you can begin.  This dough cooks at 425 degrees so I preheated my oven after I let the dough rest at room temperature.  This way once I assembled the pizza the oven would be ready.

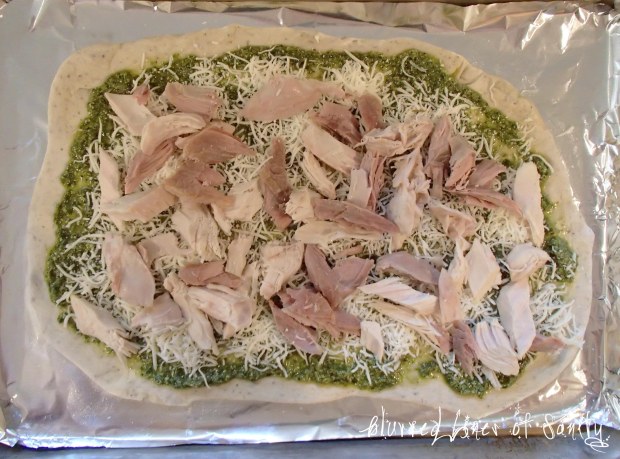
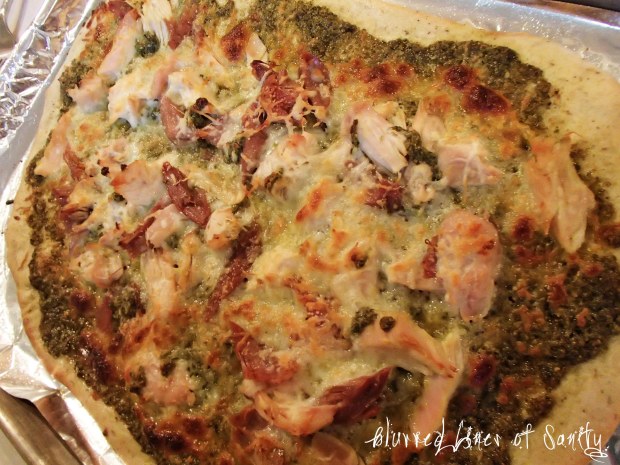
Once your dough has been rolled place 1/2 cup of pesto sauce and spread it out leaving 1/2″ border of exposed dough.  I noticed that 1/2 cup covered only a portion of the dough so I added about 1/4 cup more.  You want it to look like this:

OLYMPUS DIGITAL CAMERA

Once the pesto has been spread out take your shredded cheese and sprinkle it around the dough.

OLYMPUS DIGITAL CAMERA

Now you are going to top the pizza with your chunks of white and dark meat.  Feel free to use whichever meat you prefer, I liked a little dark meat mixed in because it brings a different flavor to the dish than just white meat.  The flavor is a lot more pronounced which I think is why you get some people that will only eat white meat.

OLYMPUS DIGITAL CAMERA

You will then placed your prepared pizza into your preheated oven for 18 – 20 mins or until the crust is a nice golden brown and the cheese is bubbly.

OLYMPUS DIGITAL CAMERA

If you give this recipe a try please be sure to come back and leave a comment letting me know how it came out!  For me it was very good the first day and just as good as leftovers even after it had been refrigerated.  At this point I noticed that the pesto was more prominent the next day, I take it  was because it had time to meld with all the other ingredients.

Looking Back on 2013

In just a few short days we will be embracing a brand new year! It seems like it was just January 2013 a few moments ago.  It is amazing how the years are just flying past, one moment you feel like you have months ahead of you and then you realize it is just days before 2014 shows up! I wanted to take some time out to reflect back on 2013 since it has just flown by and talk a bit about what I hope for 2014.

I will start with what I hope will be a bigger success in 2014 an update out on my Weight Watchers journey; 2013 didn’t go as planned for me at all.  I hoped I would be about 70 pounds down by time we got to the 31st of December but instead I am only down 29.5 pounds.  It was 30 but I gained weight a few weeks ago and I am slowly taking it off again.  Which really has been the typical story of this journey.  I spent a lot of the year doing this roller coaster of gain a pound, lose a pound, gain a pound, lose one, so on and so on.  It was/is very frustrating.  I would be doing everything right but still stay on that coaster which then after so many weeks of that it lead me to fall back into old habits.  I started ordering a lot of meals that start with a number, eating unhealthy snacks or not eating regularly at all. I also did the whole I still have X amount of months/weeks/days left of the year to get back on track.  Then bam it was the end of the year and here I am 40 pounds away from the goal. I am trying to not be too hard on myself about it, I mean we are all human and this wasn’t going to happen over night by any means and 30 pounds is still a nice chunk of weight to be gone.  I know that the journey wasn’t going to be easy no matter how much I wished it was which does make it easier for me to hopefully get back on track.  Even though it is not officially 2014 I have already started to get myself back on track, stocked up my fridge and pantry with all my favorite things.  Like Belvita breakfast biscuits in cinnamon brown sugar (tastes like graham crackers) and blueberry (tastes like a blueberry muffin in cookie form); the whole packet is 6 points which is great for a quick breakfast or hearty snack.  I have also been buying whole pineapples and cutting them up to fulfill that something sweet craving, keeping lemons & limes in my fruit basket at home to add to water so I avoid soda and actually getting at least 30 mins of exercise in a min of 3 times a week.  I hope to increase the workout time back to an hour a day but right now I am going into my busy season at work so I am starting small so hopefully I wont stop once work gets crazy.

I jumped back into this blog in 2013 officially and while many moons have passed I am still working out the kinks on making time for the blog and what content to put on it.  So I hope in this coming year I will become more regular at posting and get things more organized.  I really do enjoy blogging and sharing my life, crafts & food with everyone and want to make this a more regular thing.  I think I am my own worse enemy when it comes to it, because I have grand ideas and then I talk myself out of them and I need to learn that blogging is about being bold and I should really starting going with my gut no matter what!

In 2013 I took up screen printing and have really enjoyed it.  I don’t get to be too creative at work dealing with taxes and bookkeeping all day so it is nice to have an art hobby to do on the weekends.  I have been wanting to sell some of my screen printing items under the Blurred Lines name on Etsy, but for some reason I have been holding back and finding reasons to wait.  Here I am again being my own worst enemy.  I need to stop holding myself back, so hopefully in 2014 you will see some of the fun geeky items I have planned for purchase! Doctor Who fans need to defiantly watch out because they are going to love my Moleskine notebooks & t-shirts!

My next big crazy plan is to get my cupcake business up and running officially by the end of next year.  In 2013 Clark County finally adopted Cottage Law which allows people to make and sale items from their home.  Before this was illegal and everything had to be done in a commercial kitchen.  Which of course has always held me back, I don’t have enough clientele to warrant paying for space in a commercial kitchen. I am hoping that I can get things in order so that I can schedule a meeting and get my official license after this coming tax season so that I have the spring/summer time to get the marketing up and running officially.  This is something I want to do on the side and do not plan for it to be full time work, at least not right now. Who knows what will happen in the future.

2013 was also the year of change for me, I let some friendships go officially; which was a hard thing for me to come to terms with and I even struggle with it today.  Which is funny considering I know it was the right decision to walk away but at the same time it is never easy to lose someone you care about.  I can say that luckily while I was struggling with the loss of one friend an old friend who I had lost touch with came out of the woodwork which I am grateful for because she was a good friend and it great to see that we can overcome the past and reconnect.  So here’s to 2014 bringing in new friendships, fostering old friendships, and maybe a boyfriend or two.  😉

No matter how much change went on in 2013 the year itself was pretty good; I got to go to Cozumel Mexico for the first time, saw my first whole dinosaur skeleton, saw a space shuttle up close (it’s smaller than I thought), and even managed to move a step up within my job.  So it certainly was a good year for me but I am very ready for the New Year!  Leave me a comment below telling me about your 2013 and what do you have planned for 2014? Or tell me what did you plan to do in 2013 that you just didn’t get finished, that now you are determined to do in 2014?  I can’t wait to hear from you! Happy New Year everyone!!

Thanksgiving Madness

This coming Thanksgiving will be my third time cooking the big meal all by myself.  You would think that I would be relaxed and know what I am doing; which is so not the case!  For some reason this Thanksgiving has me all frazzled.  I am researching how to time out the dinner so things stay warm and when to pop which dish in the oven with what.  It is like a well choreographed dance routine that someone has yet to teach me.

For a little perspective and because every person that has cooked a Thanksgiving or Christmas meal has at least one crazy oh my goodness story.  I want to let you into my kitchen for last Thanksgiving.  I was cooking dinner for my folks, great aunt, and two of my friends, this is a total of 6 people including myself.  Seems simple enough, I got myself a fresh 15 lb turkey so I wouldn’t have to deal with defrosting and that I would be able to brine the turkey.  (Fun Fact: you can’t brine a frozen turkey because they put saline inside the bird to help them freeze faster so you would get an extremely salty bird, if you brined it)  It is now Turkey day it started out easy, woke up took the bird out gave it its bath and then popped that baby in the oven.  I then made my butter wine basting mixture and got to roasting.  I basted every 30 mins and my bird started turning that gorgeous brown color and things were just peachy.  Then I got a call from my friend who said they decided that they were going to go to their coworkers house instead of mine; so here I was a planned dinner for 6 turned into 4.  The upside is at least there would be less people not more at my dinner, but that still sucked to hear the day of.  So I am back to basting and thinking of all the yummy leftovers we will have, then bam out of nowhere the bird was unexpectedly done! What!? How can it be done it should have at least one more hour to go, and my guests aren’t going to be here for over an hour.  So here I was frantically calling my parents telling them to get over here because the turkey was done early.  Which then meant that I had to rush to cook everything else because I thought I had a whole hour left to cook the sides.  So I am sure your thinking this doesn’t seem that exciting or funny; and you are right up until this point it isn’t unless you could see me trying to get a hold of the folks; who of course aren’t answering their phones, running around my kitchen boiling water for potatoes, trying to get the bread out of the can and into crescent rolls, and then ultimately forgetting to get the gravy started.  All while trying to keep the bird covered so it would stay warm while I waited for my step-dad to get there and carve that sucker.  Because this girl still has no clue hot to carve a turkey or chicken without it just being chunks.

So here I am with a dinner done too early and the sides only partially done when everyone finally gets to the house.  I get them into their seats and start laying all the food out that was done, while finishing the gravy that I initially forgot about.  Then we eat and it is all delicious even with all the chaos.  Now stay with me, I still haven’t gotten to my crazy funny Thanksgiving story.  We finish our meal and I enlist my step-dad to finish taking the bird down to the bone so we can put the leftovers in the fridge.  He is happily carving away and pulling the meat off then all of a sudden he stops and asks if the meat looks cooked.  I was like what are you talking about of course it is cooked it was the right temp and we already finished eating.  Well it turns out that the top 7/8ths of the bird was cooked but the bottom portion was not.  So even though the turkey said it was done and registered at the right temp it wasn’t actually cooked all the way.  Now the crazy part is how does the bottom of the bird be the only part that doesn’t cook?  This is closest to the heating element of my stove.  Also this wasn’t the first time I have ever cooked a turkey it was my second, and the first one was perfect if I do say so myself, so I had no doubts that I could manage a turkey last year.  Well obviously I can only manage 7/8ths of a turkey.

Which brings me to this Thanksgiving, I think I am freaking out and am unable to focus because I am scared I am going to only cook 7/8ths of my turkey this year and I really do not want to repeat that.  But the other issue I am thinking about is how do you keep the turkey warm while you cook all the other sides.  Every blog post I read says they let their turkey rest from 30 mins to an hour before carving and it is still hot.  How is this possible?  I can’t even let a whole chicken rest sitting covered on my counter keep warm for 15 mins.  So how do these people manage a whole hour?

Luckily I get a little reprieve because football controls our family life and the Green Bay Packers are playing Thanksgiving Day my parents and I will be at the local Packer bar to watch the game.  Which means we will be having our Thanksgiving on Friday, which allows me one extra day to do things.  Especially since as of today I still haven’t done a single ounce of shopping; but I have made multiple shopping lists so that is a step in the right direction. I think.  I am planning to make the stuffing from scratch for the first time, brine my turkey for at least 24hrs, and bake my first apple pie in years.  Since I am freaking out I am considering making the mashed potatoes in the crockpot.  A lot of the recipes I read online seem to really like the set it and forget it approach, but at the same time what if they suck then I don’t have any potatoes.  I think I need someone to tell me to calm the heck down things will be fine and who cares really.  Worse case scenario we have to go out and eat.

So what is one of your oh my goodness stories or do you have a tried and true tip to make the turkey day schedule a breeze? Please leave me a comment below so I know I am not the only one freaking out over how to accomplish a holiday meal!

Crockpot Turkey Breast Roast

Have you ever had that craving for roast turkey, but have no motivation to cook a full turkey?  Plus who wants to heat their house up during the summer with an oven?

All Finished! Enjoy!

As you can see the meat just falls apart because its so tender!

Well the answer to those cravings is today’s post!  Today I am sharings a recipe for roast turkey breast that is made in the crockpot.  No need to slave over the oven, you can just set it and forget it.  I also chose this recipe based off of a recent conversation with one of my coworkers about how she doesn’t enjoy cooking, she isn’t sure if it is because she just doesn’t know how or if she really just hates the idea of cooking.  My advice to her was break out a crockpot and try this recipe, it is easy, short, and oh so delicious.  I told her that it would be good for her to give the set it and forget it portion of cooking a try to get her toes wet.

Gather up the ingredients and your trusty crockpot and give this a try!

Ingredients:

1 boneless or bone in defrosted turkey breast (I use Honeysuckle Boneless w/dark meat)

1 medium white onion

1 14.5 oz can of Chicken Broth (I use low sodium Swanson)

2-3 lbs red potatoes

Seasonings: granulated garlic, thyme, dill, salt & pepper

First let’s talk a little about the turkey breast.  You can find these frozen turkey breast normally right next to the full sized turkeys in the freezer section of your grocery store, they come in varying weights but most are 4-6 lbs.

Turkey Breast

©Blurred Lines

I normally buy the Honesuckle White boneless breast with white and dark meat, this is because it is just what I seem to find in the stores near me and it runs about $8 per roast; which fits in my budget for meats.  It will easily server 4 without too many leftovers.  Just depends on your guests appetites.  I will go ahead and buy a couple at a time and keep them in my freezer for that go to meal or that random craving for Thanksgiving dinner in July.  Because these breasts are frozen you do need to do some prep the day before you want to cook your crockpot meal because we need to defrost the breast before cooking.  Now I will admit I have done this same dish with a partially frozen breast and it came out just fine; actually I am pretty sure that my breast this time was a little bit frozen.  While it is not normally suggested to use a frozen roast I am here to say I survived, but please use discretion when cooking poultry from a frozen state.

Now that you have defrosted your breast the next morning you are ready to get going.  The first thing you need to do is cut your onion in half and then those halves into 4 wedges.  Break the layers a part and put them at the bottom of the crockpot.

Your turkey breast and potatoes will rest on top of them.  Next up you want to take your breast out of its packaging, at this point you will notice that there is netting surrounding the breast.  Feel free to leave it on or remove it, for this time I decided to remove the netting.

What it looks like without the netting

©Blurred Lines

  I always found it annoying trying to take the netting off the extremely hot roast when I am ready to serve so I decided to be a rebel and see what happens.  (Well the dramatic pause moment is that nothing happened it retained its shape and came right of the pot in one piece.)  So I suggest you do what feels right to you, both ways get the same results for me.  Once you have made your choice to remove or not remove the netting give the breast a quick rinse and pat dry.  Place the roast skin side up in your crockpot.  Now you need to season the breast with the above mentioned spices.  I do not have measurements because I tend to go by sight & smell versus exact measurements.  If I had to guess I would say I used about 1 -2 tablespoons of each one.  Also if you don’t like garlic use onion powder or none at all.  Feel free to add sage or even rosemary to the top anything goes at this point.

Once you have seasoned the roast to your liking drop your red potatoes next to or all around the roast however they fit best.  For me they are side by side because my crockpot is oval not round and I just have more room.  I then sprinkle additional salt and pepper over the potatoes and then pour the chicken broth around the sides.  Doing my best to not wash the seasonings off of the roast or potatoes.

Now all you need to do is place the lid on your pot set the crockpot to low and walk away for 6-7 hrs or until the internal temperature is 179 degrees.  Avoid opening the lid for the first 5 hrs, because the crockpot will have to regain the loss of heat and that can cause the food to take longer to cook.  If your crockpot tends to cook on the high side this could be done closer to 5 hrs.  I know mine runs high and it would have been done at 6 but I let it cook for 7.  It still maintained all the flavors and was not dried out but it was running closer to 206 degrees internally instead of the recommended temp of 179.

Once it is done cooking remove it from the crockpot and allow it to rest for 2-3 minutes then slice and enjoy!  When you give this a try please come back and let me know how it turned out, if you made any changes, or if you know of tip/trick that enhances things!

DIY Jewelry Organizer

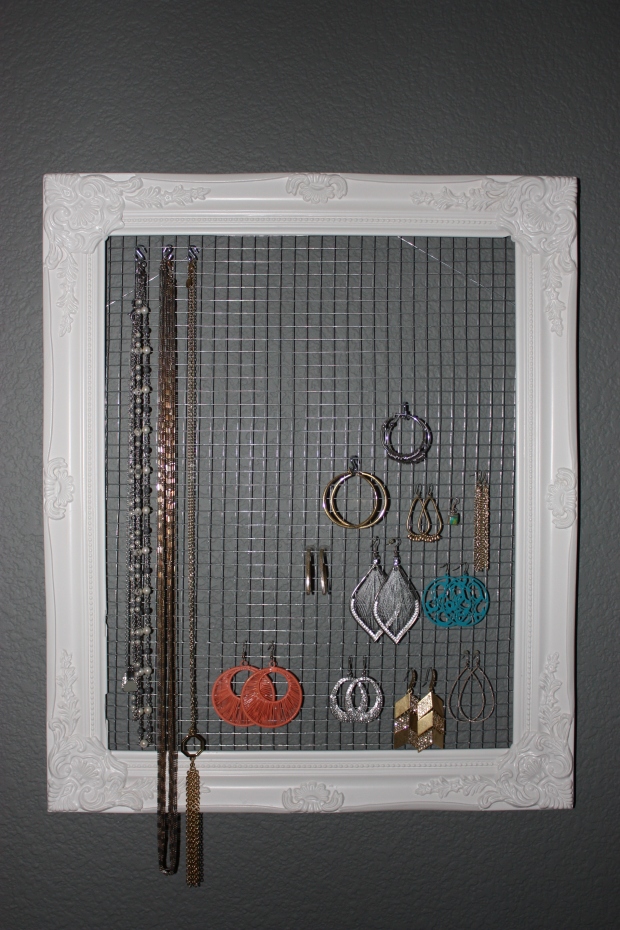
I am sure that if you are reading this you are like me where unexpectedly your jewelry has taken over your dresser.  For me it was like it happened over night one day things were nicely organized and then boom it was like jewelry exploded all over.  I already had this tree stand that held my pieces, but I started to realize it just was not useful anymore.  It was good when I had just a couple pieces but once my collection started to grow and evolve it wasn’t working out anymore.  My next issue was that I couldn’t find anything that worked with my decor or that was really any different than I already had.  I didn’t want to end up with 3 or 4 tree organizers on my dresser just to keep things organized.  So in order to get something that would be functional I knew I was going to have to make something myself.  I needed something big enough to hold long necklaces and be able to blend in with the room and not stand out too much.  Because it is a frame the jewelry pieces become a work of art on my wall when they were hung up.

Here is a look at what you are going to make!

IMG_0574

©Blurred Lines

I started with some research on of course Pinterest and found a lot of pictures of organizers like I wanted or similar to what I needed but very few actually had instructions.  Most of the pins were dead ends which is a whole other topic because that is a major pet peeve of mine on Pinterest.  I am sure I am not the only one that hates dead end pins.  So I decided to just give a go and here is how I did it.

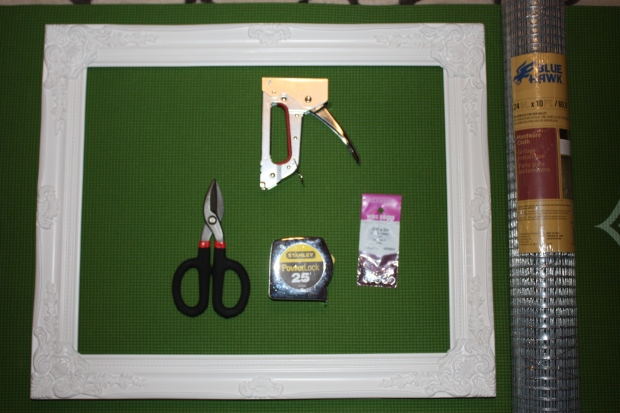
First you need to gather up your supplies:

– Frame in any size; should be all wood so that you can attach the staples.  I picked out a white frame that measures from the exterior 20″W x 24″H

– Roll of poultry netting – can be found in your hardware store near the fencing. I purchased a square shaped netting but you can get the standard hexagon shape.  It depends on the look you want. (the octagon shape will be more country themed; versus the square which feels more modern)

– Staple gun & staples; I used 1/4″ staples

– Tin snips to cut wire netting

– Gloves (this is a must more on why later)

– Towel or mat to lay frame on

IMG_0557

©Blurred Lines

Once you have all your supplies, lay out your work space.  You are going to need a pretty large area to work with the netting.  Working with the netting is the hardest part so you will want some space to move around in but once you get things cut it becomes a bit more manageable.

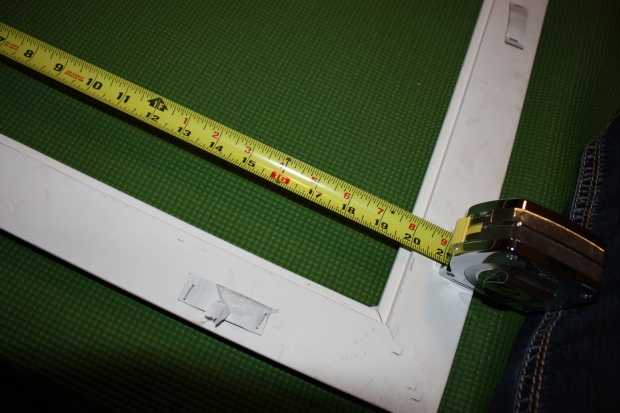
Now that you have your space all laid out you are going to want to spread out your towel or mat; I used my yoga mat for cushion.  Place your frame upside down on the mat and measure the inside width and height.

IMG_0561

©Blurred Lines

Be sure to measure it from each corner and down the middle, to verify that it is the same distance.  For me the interior measurements were 16″W x 20″H.  Now that we know what the interior measurements are we will need to cut the netting.

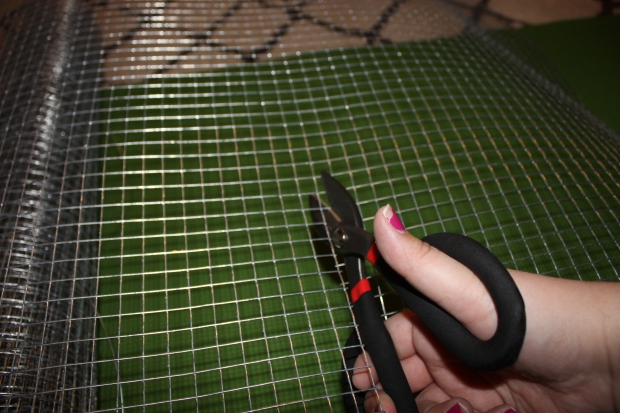
Cutting the netting can be a bit tricky, here is where you should grab a pair of gloves.  I did not use some and regretted it, the edges are prickly.  So do the opposite of me and protect your lovely hands!  For me the getting the roll unwrapped was a bit of an issue it has wire wrapped around the outside spiraling inside as well.  So when removing this wire the roll quickly expands.  This is where the gloves come in handy because you can grip and move things around with a bit more ease.

IMG_0563Now that you have gotten your netting rolled out, you may need to fold and mold it to get it lay flat enough to work with.  Luckily it is mold-able so you can adjust this as needed.  Once you have it flat enough you need to measure out a piece the size of the inside of your frame.  Cutting the wires isn’t easy at first but once you cut the first few rows you will get the hang of it and it will move smoothly.  I noticed I had to make sure that the wire was close to the inside of the snips to get the full pressure of the blades.

IMG_0565

©Blurred Lines

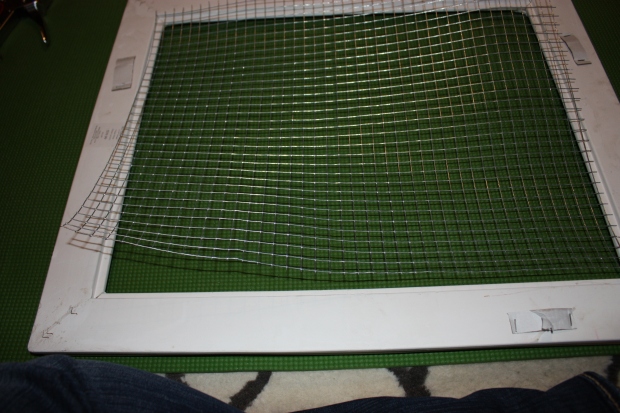
Now that your netting is cut you will want to lay it inside your frame and make sure that things are fitting correctly.  You will have to do some adjusting of the wire by bending and molding it to lay flat inside the rim of the frame.  This is a bit time consuming and you will be adjusting things even when you begin to staple too, so it doesn’t have to be perfect but should be close.

©Blurred Lines

©Blurred Lines

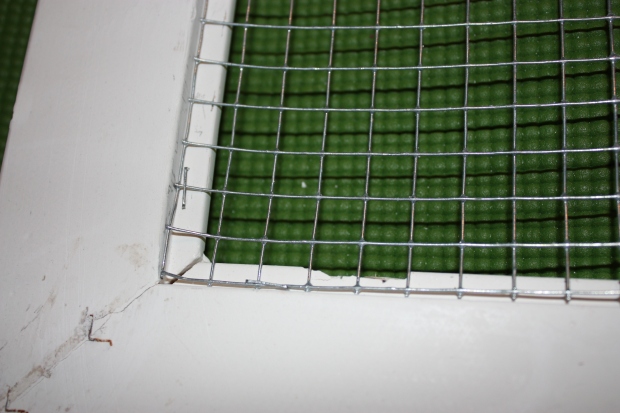
Now for the tricky part you are going to staple the netting into place.  Start at one corner and staple it as close to the inside of lip.  If you staple to close to the outside of the frame it could chip the frame; you can see this in the picture below.  I got a little too close to the edge and ended up dinging my frame.  I actually did this twice during the process, so I have a couple chips that can be seen from certain angles.

©Blurred Lines

©Blurred Lines

If you notice the staple that is on the left side of the photo this is how close you want to staple the netting.  I would place a staple ever 2 – 3 inches along each side, being sure to staple at the corners first.  Adjust the staples to your frame you may need more or less, I noticed in some areas I added a few extra because the netting didn’t lay just right.  Once you have stapled the netting down you are all set to begin your organization.

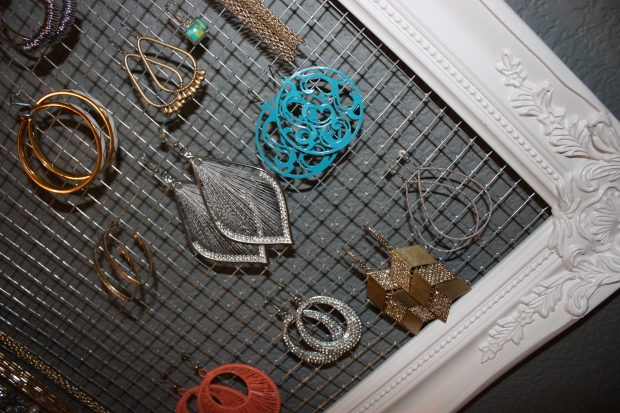
I used small S hooks to hang the necklaces and a few hoop earrings.  You can get these S hooks in different sizes depending on your jewelry needs.  Here is a close up of the bottom corner and how everything lays once hooked on.

IMG_0581

©Blurred Lines

You are now all set to keep things organized!  I will admit now that I have taken my items off of the tree stand I had and put them on this frame, I am able to see things more clearly.  Which has allowed me to wear pieces I forgot I had because the pieces look better when you can view them.  I am already planning to make other frames of different sizes because I unfortunately or fortunately depending on how you look at it have too many pieces for this frame and it filled up really quickly.

I hope you give this a try for your jewelry organization.  If you do make one be sure to come back and let me know how it went!

Breaking Away From Facebook

I am just going to assume it is safe to say that if you are reading this you have a Facebook account.  Who doesn’t these days?  Pretty much every business, person, and pet has one.  Hearing that someone doesn’t have one is so rare that when we do hear it we are shocked.  Which brings me to today’s post, I have decided to leave Facebook behind and break away.  You know what?  It isn’t as easy as it sounds.  You would think that all you need to do is deactivate/delete your account.  In theory you are right, but before you can do that you have to take into account the pages you’ve created or websites you use with that login.  Which of course I do both, so that means no deactivating my account because I still need to get to these pages/websites.  But before I go into all that lets go back to why I decided to do this.

Recently I have started to notice that Facebook has become more of an irritation rather than a fun way to keep up with everyone.  It use to be so nice to see what people where doing; whether it was traveling, getting married, or having babies.  You got to be a part of things even if you couldn’t be there in person.  It started out this way but over the last year I would catch myself scrolling through my news feed just trying to see what people were saying but could rarely see these statuses because they were clouded by all the ads, game suggestions, sponsored likes and the shared photos from other pages.  It has become about the money versus the people.  Most of my feed has now resorted to people just reposting photos from other pages versus a status.  Then you add that most of the other social apps like Twitter, Instagram, and Pinterest link to Facebook accounts so you then have to deal with all those posts on Facebook and if you use those apps on there as well.  It was so much over kill that I noticed I was getting more and more irritated each time I logged on to Facebook.  Every time I had to scroll past a sponsored ad or like I would just cringe.  You would think that if I noticed myself getting irritated that I would just stop checking but at that point it was part of the routine that I just couldn’t help myself.  I caught myself checking Facebook randomly without even really thinking about it on my phone; I would check it in the morning and all through the night.  It was like it was a habit or even an addiction.  I had to click the app and see what was going on.  I would say to myself something interesting has to be going on then I would click and find out that it was just e-cards and political posts over and over again.

I then began to notice that the app for the iPhone was acting weird it was showing me posts that were three days old which I had already seen.  Then I would get these random notifications that a friend was doing something somewhere in the city that I have no connection to.  It was becoming a thorn in my side and I was no longer getting anything from being logged on and that was when I decided I needed to take a step back.  I started with first saying  “I am not going to check Facebook for the rest of the evening”, then I would catch myself an hour later clicking the app on my phone during a commercial.  I tried this for a couple days failing each time and ending up back on the app.  I eventually got to a couple days ago where I decided to take the leap and delete the app from my phone.  Hopefully preventing me from accessing without thinking.  Honestly that was really liberating; it was like a weight had been lifted off my shoulders.  Who would have thought that something so simple would have that effect.  I do catch myself zombie like trying to go to the app but then realize the app is gone and put the phone down.

While I made it through the next few nights, and was very happy about that.  It was nice to not have it as part of the evening.  I do have to admit I did ended up checking Facebook the next morning approximately 13 hours after I deleted the app while at work.  I was not surprised at all that I hadn’t missed anything because that is exactly what happened I didn’t miss a thing, it was still all ads, sponsored likes, game requests and shared e-card pics.  I ended up checking a couple times throughout the day while at work out of habit but I quickly closed the tab and moved on.  Even as I write this post I will admit I looked this morning at Facebook after going almost 24 hours and it still is exactly the same and I am not missing things at all.  It is a bit easier to not check it, especially since I am seeing that there is nothing special going on.  People are still posting all the same things that I am just not interested in anymore.

Now at this point you are probably saying why not just delete you account and move on.  Which trust me I want to do, but I don’t think people realize how connected everything today has become to Facebook.  For me I manage my jobs page on Facebook; so in order to do this I have to be logged on as me so I can get to the admin page.  So I am bound to it through Facebook.  Then you have to think about all the other things that Facebook links to, like Pinterest.  My account is linked to Facebook.  Well I like Pinterest so if I get rid of Facebook will I loose my pins and have to start over?  Even Groupon & Living Social allow you to access their sites with Facebook login, well if you don’t have an account you can no longer access those things.  The other way that I have noticed the take over of Facebook has been through blog contests.  A lot of the contests that I have seen late require you to Like their page on Facebook in order to gain an entry in their contest.  In general even when I enjoyed Facebook I didn’t do those type of entries because I didn’t want to share all my Facebook information with the blog.  I have always thought about the fact that each time you use that login somewhere you are sharing that information.  We do it so easily these days that we begin to get blinded by how far Facebook’s reach has gone.

Now I am not against social media as a whole, I am a big lover of Twitter and Instagram.  I still use them daily but because they are only really focused on one to two things I find them easier to enjoy.  I don’t cringe or feel irritated about their content so it keeps me going back.  So how do you feel about Facebook these days?  Do you still love all the changes and find that it is a great site?  Or are you like me struggling with the choice to leave?  Leave me a comment and tell me your perspective!

Popsugar Must Have Box – May 2013

Well unfortunately this review is coming a bit late, things have just been crazy I haven’t had time to focus on getting a picture of the items.  I was really hoping I was one of the lucky winners of the clutch bag, but at lass I was not.  I think this popped my excitement bubble a little because the contest was one of the deciding factors to keep my subscription one more month.

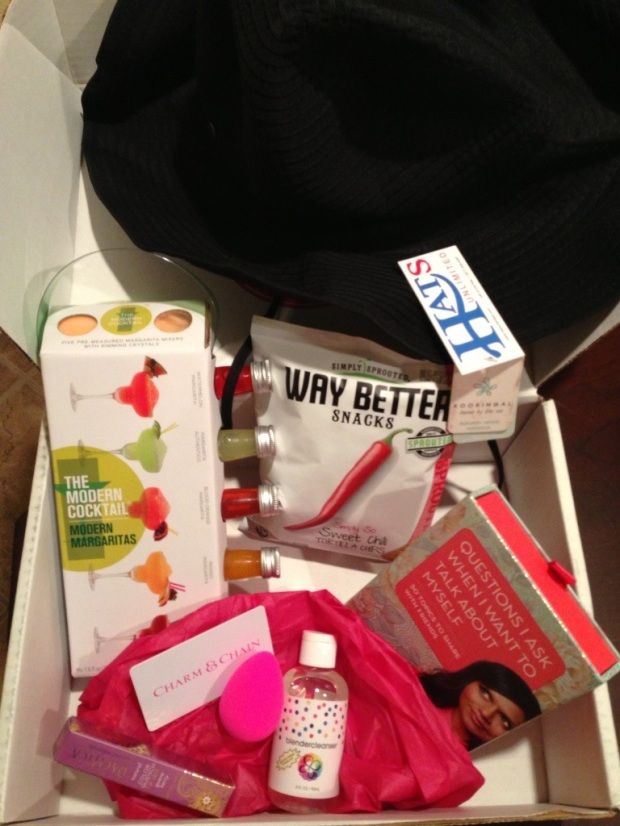
So here we go May’s must have box.

©Blurred Lines

©Blurred Lines

I will start at the top and work clockwise.  First up the Giselle Mid-Brim Hat by Kooringal.  © Blurred LinesI was a bit excited to see a nice floppy hat for the summer, it has a molded-able brim so that it can be easily packed for those summer trips to the beach.  But the hat itself is a bit small for me so I can’t really pull it down onto my head.  Because it sits so high on me the top of the hat really sticks up and looks like I have a cone head, it is a bit stiff so I don’t think I will be able to use it.  I may have to see if my mother would like it.  To the left is a better picture of the item since it was hard to get the right angle in the group shot.

Next up we have the Sweet Chili chips from Way Better Snacks; this was one of the box extras that they normally throw in.  I have yet to try these but I am looking forward to them, it seems like a great flavor.  This is a company that I have never heard of before and I like that they use nuts and grains to enhance them.  They do use a technique called sprouting which allows the grains and seeds to release their hidden benefits before they are put in the chip.  Since I have been on weight watchers for the last few months I am always looking for ways to get those random snack cravings that come up.  So I have high hopes for these chips, stay tuned to my twitter @TheBlurredLines for an update on how they taste!

Now we have the Mindy Kaling Questions I Ask When I Want to Talk About Myself conversation cards.  When I first saw this I was really excited, I love conversation cards.  I own two Table Topics cubes and love to bust them out when I have people over, so another set of conversation cards sounded great.  Then I opened them up, they aren’t necessarily conversation cards as much as just a way to put parts of her book on cards and then a tiny question at the bottom, almost so small to read on some you might think it is a footnote.  Now don’t get me wrong I read her book and it was funny, so there is no doubt that her little stories wont be funny, but I don’t think this was the best medium for this.  Maybe if I hadn’t read her book I would have found them better, I will leave them on the coffee table and see if they get the conversation going but I am not really on board yet.

Next up is the Beauty Blender and Cleanser.  This is a raindrop shaped makeup applicator sponge.  This sounds like a nice product providing a way to apply seamless makeup application.  Now for my daily routine does not include any actual wet foundation, I just use powder as a base.  Now on occasion I do go a bit more detailed and use foundation so I will give this a try when I do that.  I am not sure if it will work as well with just my powder but I should test that out sometime.  The nice point would allow you to get into the more hard to reach points like right around the nose and your under eye area.  The nice thing about this item was that it came with the cleanser to help keep things nice and clean.

Right next to that is the Charm & Chain $30 gift card towards a purchase.  Now I am not a fan of them putting gift certificates in the box; I would rather get a piece so I can see the quality before making a purchase.  So I was a bit disappointed to see this as part of the value of the box.  I did go to their website and unfortunately there is nothing on the site that is for $30 or below, everything is over this price.  So we do have to put up money to get something.  And of course all the pieces I actually liked were $100 and up.  Which for my budget it just doesn’t fit.  The one piece I found close to $30 was a pair of turquoise earrings but even though they were listed under turquoise they were no longer available unless I got them in a rose color.  So that was  a bit disappointing.

Next up is the Pacifica Color Tint Lip Tint.  I received the guava berry which in the tube looks like a deep purple red color.  It smells really good when you open the tube.  Upon application to the lips it turns a soft pink/purple color which was not intense at all.  At first I was a bit nervous because the color in the tube is dark, so I was happy to learn that it is sheer.  This is perfect for me because I have been looking for a light pink color that I can throw on for day to day.  Now the scent and flavor once on the lips is a little weird, almost fruit mixed with mint.  I am hoping I get used to this the more I wear it.  But overall I am very happy with this lip tint and even more happy that it was not a pot like Popsugar is more famous for sending.  By sending something in a tube it was already gaining marks.

Last up we have the Modern Margarita Cocktail kit.  This kit comes with 5 different margarita flavors and colored rimming sugar.  Since this box came after Cinco de Mayo I was not able to give this a shot, but I do plan to keep it on hand for my next cocktail party or gathering.  I did see that you can pick this kit up at Target over the weekend on sale for $5.99.  So if these taste amazing at least I know it is something I can get just around the corner.

Retail Price Breakdown

Kooringal Hat: $27.99

Mandy Kaling Question Cards: $14.95

Beauty Blender & Cleanser: $23.95

Chain & Charm:  $30.00

Pacifica Lip Tint: $7.00

Modern Cocktails: $8.29

Total Retail Value: $112.18

($82.18 value without gift certificate)

*The chips are not included in the price breakdown because they were listed as an extra but retail for $3.

If you have been following my last few reviews you know that I have been on the fence about my monthly Popsugar subscription.  Things just have not been living up to the boxes that I was receiving at the start of their service.  With April’s box being as bad as it was I actually planned to cancel after receipt of the box and the only reason I didn’t was because I received an e-mail saying they were running a contest where they were giving away 10 clutch purses in May’s box.  I am sucker for a cute purse so I really hoped I would be one of the lucky ones.

Overall my opinion is this box was just OK, most of the stuff I wont be using and the only thing that stands out to me is the lip tint.  I am especially disappointed about the $30 Charm & Chain gift card, if you take this away from the merchandise that was included in the box the box falls under their $100 box value.  While I do not expect each box to be way above $100, I want the quality of items to meet that value.  Lately this just isn’t happening and when one of your main items in the box is a gift card it takes away from the overall value that you are receiving.  I do think for the most part this has been a fun subscription but a few days after receiving May’s box I cancelled my subscription and will no longer be getting their boxes.  I do know that just within the last few days I saw on one of the Popsugar sites they said there are still a 100 boxes left for June, so I am guessing that they have had a few cancellations over the last few months because for months they were sold out and you couldn’t even join up for at least 2 months.  So this is saying something about the subscription.

I do plan to keep tabs on their boxes and see if at a later date I want to rejoin because their idea of being well rounded and providing things from all different areas is a great idea where as most boxes are just based on one subject.  So for now I am going to be looking into other subscriptions.  I really do like the idea of subscription boxes and there are so many out there it is hard to choose; so for right now I haven’t decided on a replacement.  If you have a monthly subscription you love leave me a comment so that I can check it out!

**I was not paid or compensated in any way for this review